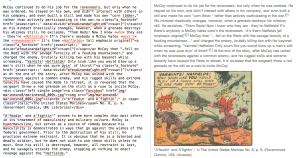
Building "The Military-Masculinity Complex"
In my last post I discussed the conceptual framework behind the design of my History MA thesis. In this post, I’ll describe the workflow I ended up using as I completed the project. This workflow changed quite often, and ended up being more complicated than I would have liked. My development environment was largely dictated by a requirement that had little to do with my actual project. The Graduate College required a PDF of my thesis for submission to DigitalCommons, and this (meticulously formatted) PDF was essential to the granting of my degree. So, I had to write my thesis in such a way that I could quickly and easily flip my web project into a viable PDF which would (unfortunately) be accessed by interested scholars alongside my project.
 Mou has a clear, simple display, syntax highlighting, and an output preview.
The obvious choice for me was to use Markdown, a very simple markup syntax that allows users to easily convert plain text to HTML, XHTML, RTF, or a number of other document formats. Markdown enabled me to make a single draft that could be pressed into HTML and RTF instantaneously, satisfying my needs for both formats. I wrote my entire first draft in WriteMonkey on my PC, and encountered quite a few annoying bugs. I did like the writing environment and plethora of shortcuts, but I was constantly plagued with crashes. I purchased a MacBook Pro in the Spring, installed Mou and never looked back. It offered great functionality, elegant design, an instant preview, and syntax highlighting – and it never crashed or froze on me. Obviously, there is much more to the display of a web project than sufficient HTML text markup in the body. I also had to work in the header and footer, navigation, and footnotes using other methods. Ideally, the framework around the text would be done with PHP or some other scripting mechanism that pulls in the corresponding text body, along with any other entities I wish to display. However, my long-term accessibility plan required flat HTML pages, so I had to come up with another solution. For that, I drew upon Jekyll, a Ruby application that creates static websites and blogs from plain text files. With Jekyll, you can develop templates with a call for a text input.
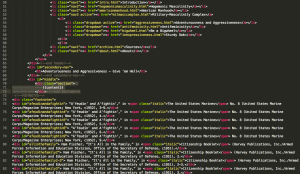 The gist of the template – the top menu is shown in the top portion, the middle highlighted portion is the Jekyll
 content call, and the bottom portion shows the hidden footnote divs.
Jekyll then runs on a plain text file and produces an HTML file with the text content inserted into the template. Jekyll is great for blogs, when you want to create lots of static pages that are identical, besides the body text. I elected to complicate things and create a different template for each of my pages. While this would seemingly defeat the purpose of Jekyll, the sidebars for each page required different text, and the footnotes would add a lot of superfluous text and code to the plaintext, which I routinely sent in the form of a PDF to my advisors and others for input. Because of this, my Markdown files only supplied the content of the large ‘main’ div on the page, and everything else was included in the HTML ‘layout’ files.
Footnoting Digital Writing
My last hurdle was the one that required the most time thinking, rethinking, overhauling, and staring at code. I’ve never been completely happy with footnotes the web. Anchor links (even with with return links) to notes at the bottom are sufficient, but can be disruptive. In the past, I elected to use parenthetical footnotes, with a full note visible on hover and a link to an anchor in the bibliography. I was a fan of the sidebar Grantland uses in its articles, but I didn’t want to overwhelm readers with a screen full of text, and I wasn’t sure how I could space them out so that they were next to the citation.
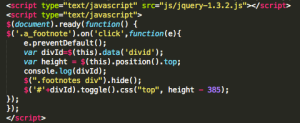 The jQuery snippet that makes footnotes appear in the right portion of the page.
I initially planned to use the parenthetical technique on my thesis, but decided I would have to abandon it because of touchscreen compatibility. Around the same time, I created a website that used jQuery .hide(), and it occurred to me that I could hide/show footnotes in a sidebar. I investigated more, and found that I could make the jQuery adjust to the vertical height based on the vertical height of the trigger in the div. The code was actually pretty simple, although it had to be adjusted manually based upon the amount of space above the div on each side.
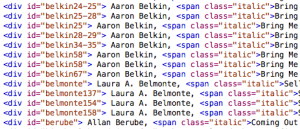 The text of the actual footnotes, which were embedded in the template and appeared on the right side.
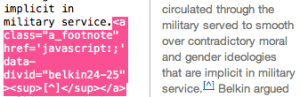 The footnote code is shown at left, with the HTML display at right
All of my citations were embedded in the layout file for the pages, and were given IDs based on a very simple naming schema. The source as a whole was given a unique name, and references to individual pages or sections were given their own ID with the page number(s) at the end. Every in-text citation (which appeared as [^]) then had a javascript trigger with a corresponding ID. I kept files open that contained all of the triggers and all of the footnotes, and added to them or inserted them as necessary. I can’t help but think there may be a better way to dynamically produce the page numbers and reduce the total number of divs, but I couldn’t come up with a viable solution. This ended out working well for me, though it did take a considerable amount of time and effort to organize and implement.
Analoging the Project
The final step in my process was probably the most painful. To meet the graduation requirements, I had to smash my entire project down into a PDF, and lose all of the wonderful hypertextual connections I had made. I had to do it though, and Markdown made it fairly simple. I did a Find & Replace to delete all of the HTML in the citation triggers, and leave them with just the ID name and @@ added to the end. I used this as a quick reference to find all of the footnotes I needed. I then used Pandoc to process all of the files into .docx and used the Zotero plugin for Microsoft Word to change all of the @@ placeholders to actual footnotes.